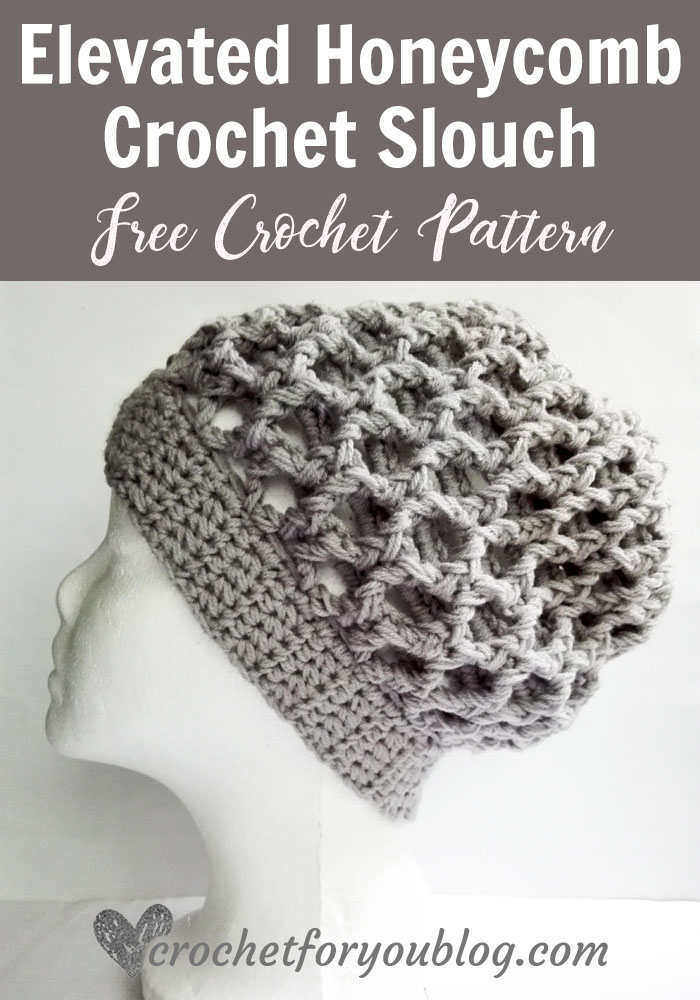
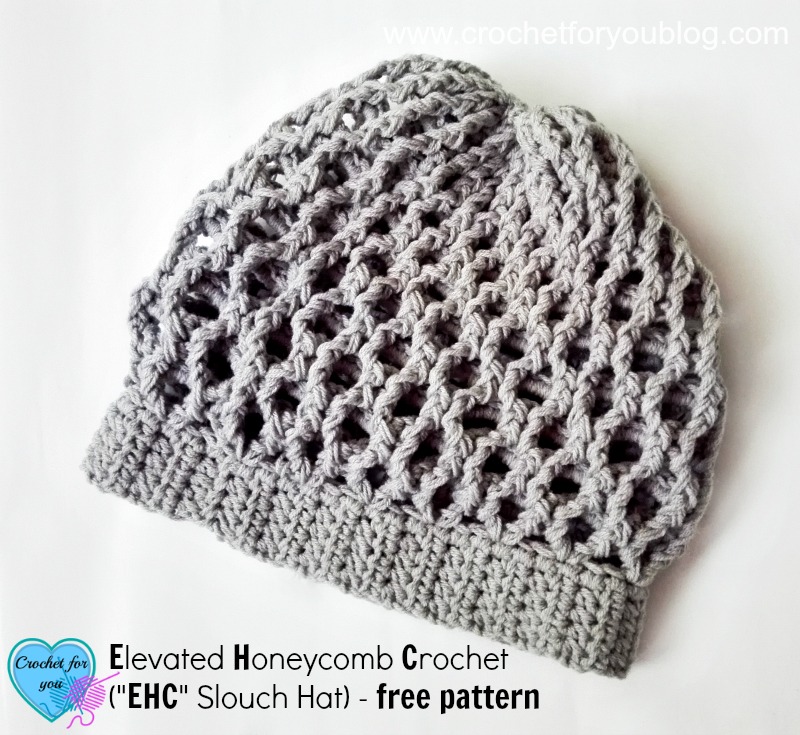
Free Elevated Honeycomb Crochet (“EHC” Slouch Hat) Pattern
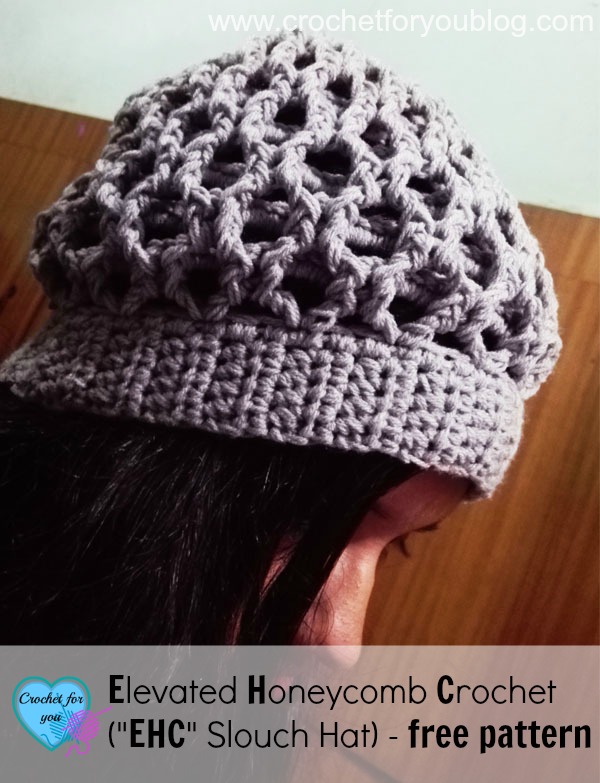
Elevated Honeycomb Crochet (“EHC” Slouch Hat) Pattern by Crochet For You.
I proudly present Free Elevated Honeycomb Crochet Slouch hat Pattern with the new stitch that I found a couple of months ago. I felt really happy about my new crochet stitch. And I want to bring you nice and modern pattern with the “EHC” stitch. “EHC” is shortened name for Elevated Honeycomb Crochet. It is short and easy to remember. Updated: Click here for EHC Cowl pattern.
Disclosure This blog contains affiliate links.
Don’t forget to add this pattern to Ravelry queue
The Idea of the name for this stitch is from Becky from Grammy’s Creations. She told me how to shorten the name for easy to remember. I want to thank again Becky and other crochet blogger friends for the great help. 🙂
Skill level Intermediate
Finished size (adult)
- Hat length top to bottom with band = 10”
- Hat Circumference = 21”
- Band = 1.5” x 21”
Materials
I used 2 strands of sport weight yarn held together (15 WPI)
You can use worsted/ bulky weight yarns match with the gauge instead of 2 strands of sport weight yarn. I found these Worsted yarns match with the gauge.
- Gray color = Approx: 230 yards of worsted/bulky. (400 yards total to work with 2 strands of sport weight yarn)
- 5mm crochet hook to make a band
- 6 mm crochet hook
Abbreviations
- ch(s) = chain(s)
- sc = single crochet
- hdc = half double crochet
- dc = double crochet
- fpdc = front post double crochet
- st = stitch
- sl st = slip stitch
- sk = skip
- ch-sp = chain – space
- [] = work instructions within brackets as many times as directed
- * to * = work instructions within brackets as many times as directed.
Special stitch:
- fpdc2tog: [Yarn over, insert hook from front to back and to front around the post of the next st, yo, pull up a loop, yo and pull back through 2 loops] 2 times, yo and pull through all loops.
Gauge: 13 dc and 7 rows = 4” with 6mm crochet hook.
Note:
- beg ch does not count as st.
- Use the stitch marker to not to miss last st in each round.
- This slouch worked bottom-up.
About the pattern
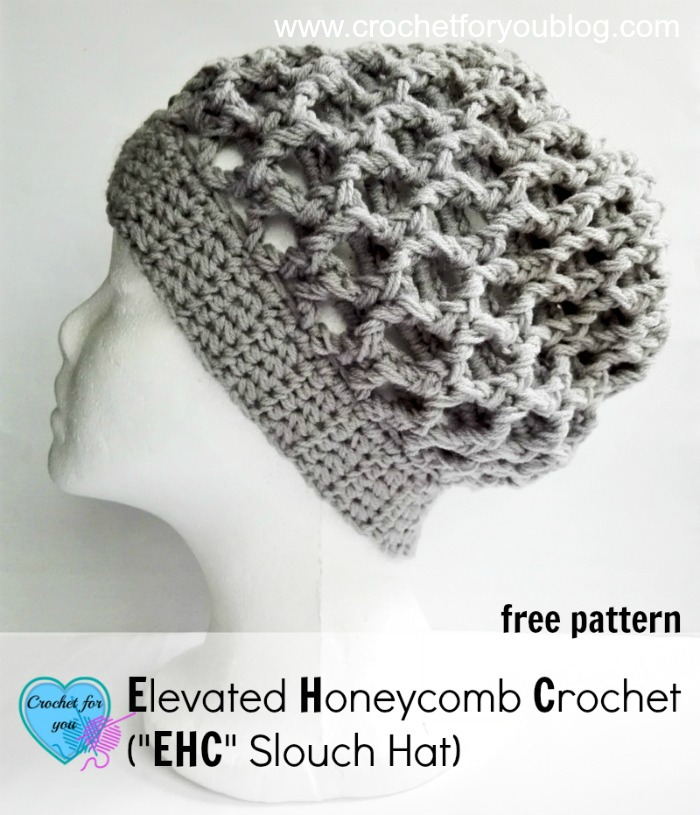
The texture of this crochet stitch I used to EHC slouch looks like the honeycomb. It’s really stretchy. I really love this stitch pattern. That’s why I have already started neck warmer with this stitch.
Updated: Here is the “EHC” cowl pattern. Click on the photo to go to the free pattern.
Elevated Honeycomb Crochet (“EHC” Slouch Hat) Pattern
Band
Leaving 8” long tail of yarn, crochet ch 6 with 5mm crochet hook.
Row 1: hdc in 2nd ch from hook, hdc in next 4 ch(s). (5 hdc total)
Row 2-51: ch 1, turn, hdc in each st across. (5 hdc total)
Body of the slouch
(Work in long side of the band. Switch to 6mm crochet hook)
ch 1, sc in each st around the long side of the band, sl st to first st. (51 sc total)
Round 1: ch 2, (1 dc, ch 5, 1 dc) in same st, *sk next 2 sts, (1 dc, ch 5, 1 dc) in in next st* repeat *to* around, sl st to first dc. (17 (1 dc, ch 5, 1 dc))
Round 2: ch 2, fpdc in same dc, 5 sc in ch-sp, *fpdc in next 2 dc, 5 sc in ch-sp* repeat *to* around, last fpdc sl st to first fpdc. (85 sc / 34 fpdc)
Round 3: ch 2, fpdc in same fpdc, *sk 5 sc, fpdc in next fpdc, ch 5, fpdc in next fpdc* repeat *to* around, last ch 5 sl st to first fpdc. (17 ch-sp / 34 fpdc)
Round 4: ch 2, fpdc in same fpdc, fpdc in next fpdc, *5 sc in ch-sp, fpdc in next 2 fpdc* repeat *to* around, last sc sl st to first fpdc. (85 sc / 34 fpdc)
Round 5: ch 2, fpdc in same fpdc, *ch 5, fpdc in next fpdc, sk 5 sc, fpdc in next fpdc* repeat *to* around, last fpdc sl st to first fpdc. (17 ch-sp / 34 fpdc)
Round 6: ch 2, fpdc in same dc, 5 sc in ch-sp, *fpdc in next 2 fpdc, 5 sc in ch-sp* repeat *to* around, last fpdc sl st to first fpdc. (85 sc / 34 fpdc)
Round 7: ch 2, fpdc in same fpdc, *sk 5 sc, fpdc in next fpdc, ch 4, fpdc in next fpdc* repeat *to* around, last ch 4 sl st to first fpdc. (17 ch-sp / 34 fpdc)
Round 8: ch 2, fpdc in same fpdc, fpdc in next fpdc, *4 sc in ch-sp, fpdc in next 2 fpdc* repeat *to* around, last sc sl st to first fpdc. (68 sc / 34 fpdc)
Round 9: ch 2, fpdc in same fpdc, *ch 4, fpdc in next fpdc, sk 4 sc, fpdc in next fpdc* repeat *to* around, last fpdc sl st to first fpdc. (17 ch-sp / 34 fpdc)
Round 10: ch 2, fpdc in same fpdc, *4 sc in ch-sp, fpdc in next 2 fpdc* repeat *to* around, last fpdc sl st to first fpdc. (68 sc / 34 fpdc)
Round 11: ch 2, fpdc in same fpdc, *sk 4 sc, fpdc in next fpdc, ch 4, fpdc in next fpdc* repeat *to* around, last ch 4 sl st to first fpdc. (17 ch-sp / 34 fpdc)
Round 12: repeat row 8.
Round 13: ch 2, fpdc in same fpdc, *ch 3, fpdc in next fpdc, sk 4 sc, fpdc in next fpdc* repeat *to* around, last fpdc sl st to first fpdc. (17 ch-sp / 34 fpdc)
Round 14: ch 2, fpdc in same fpdc, *3 sc in ch-sp, fpdc in next 2 fpdc* repeat *to* around, last fpdc sl st to first fpdc. (51 sc / 34 fpdc)
Round 15: ch 2, fpdc in same fpdc, *sk 3 sc, fpdc in next fpdc, ch 3, fpdc in next fpdc* repeat *to* around, last ch 3 sl st to first fpdc. (17 ch-sp / 34 fpdc)
Round 16: ch 2, fpdc in same fpdc, fpdc in next fpdc, *3 sc in ch-sp, fpdc in next 2 fpdc* repeat *to* around, last sc sl st to first fpdc. (51 sc / 34 fpdc)
Round 17: ch 2, fpdc in same fpdc, *ch 3, fpdc in next fpdc, sk 3 sc, fpdc in next fpdc* repeat *to* around, last fpdc sl st to first fpdc. (17 ch-sp / 34 fpdc)
Round 18: repeat row 14
Round 19: ch 2, fpdc in same fpdc, *sk 3 sc, fpdc in next fpdc, ch 1, fpdc in next fpdc* repeat *to* around, last ch 1 sl st to first fpdc. (17 ch-sp / 34 fpdc)
Round 20: ch 2, fpdc in same fpdc, fpdc in next fpdc, *1 sc in ch-sp, fpdc in next 2 fpdc* repeat *to* around, last sc sl st to first fpdc. (17 sc / 34 fpdc)
Round 21: ch 2, fpdc in same fpdc, *fpdc2tog* repeat *to* around until last fpdc, fpdc in last fpdc, sl st to first fpdc. (16 fpdc2tog / 2 fpdc)
Fasten off and cut the yarn leaving 10-12” tail.
Finishing
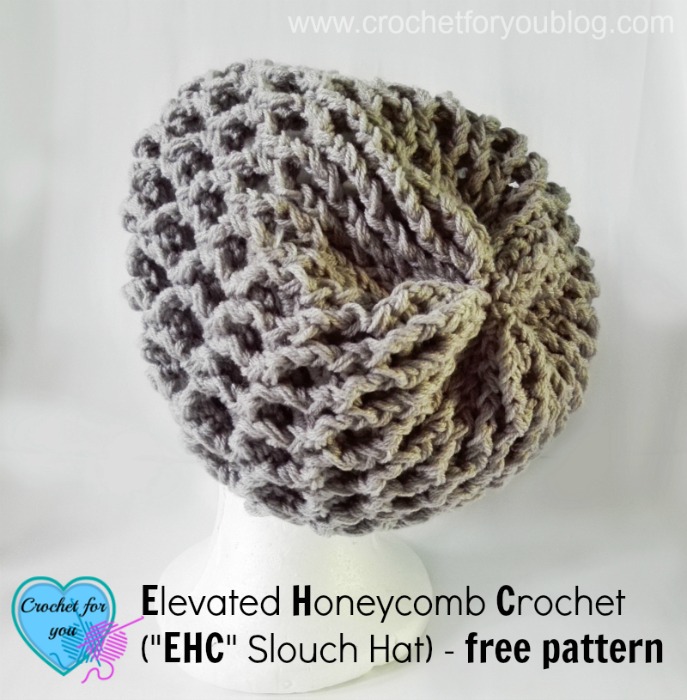
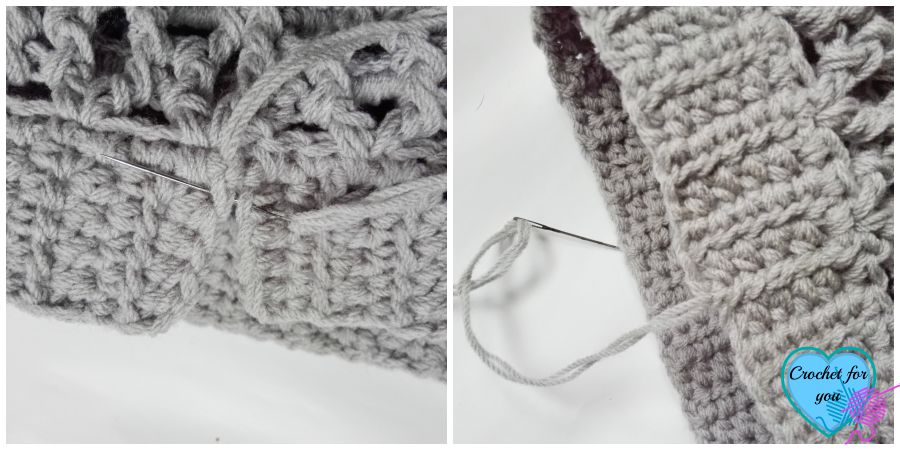
Close top of the hat. (I used contrast color yarn to show you it clearly. See the images below)
Turn inside out first. I forget to do that when I took these example photos.
Insert the yarn through tapestry needle and weave through space between fpdc2tog sts. Pull the yarn tightly and close the top of the hat with few more stitches.
Sew the 2 short side of the band with the yarn tail. Fasten off and weave all ends.

Hope to see you soon with a new FREE pattern
Until then, Happy Crocheting!!
Share your finished projects of this pattern on Crochet For You FB page.
Happy hooking with Crochet For You!!
Let’s connect and share
Facebook | Pinterest | Twitter | Instagram
All contents include photography and patterns are copyrighted Crochet For You by Erangi Udeshika.
Do not copy, edit, distribute or republish patterns and images in this blog in part or whole as your own. Please, share a direct link to the pattern with others and anywhere else. You are welcome to make and sell finished items using my patterns.
Visit Copyright / Terms of use for more info. Thank you.



15 Comments
Kristina & Millie
how fun and unique! Love this elevated honeycomb crochet hat 🙂
Erangi Udeshika
Thank you 🙂
T'onna @ USS Crafty
I just love this hat! Thanks for sharing the pattern. I’m pinning it!
Navy Wifey Peters @ The Submarine Sunday Link Party
Erangi Udeshika
Thank you T’onna 🙂 Love your party!!
Taylor
I’m not understanding how to find the stitches in the long side of the band?
Erangi Udeshika
Hi Taylor, before you start to crochet EHC stitch, you want to crochet sc in each st around the edge of the long side of the band with 6mm crochet hook. It means you have to crochet 1 sc in each side st of the band. If you look at the main photos carefully, you can see sc round in the long side of the band just below the first round of EHC stitch of the slouch.
Judith
Yes, this is the toughest part. Even the sc has to go somewhere, and as Erangi said, it’s hard to find the stitch to use on the long side of the band.
Sally Gobrecht
I’ve done the band and the first sc row, and also the first Round with the chains that made loops, but I can’t figure out how to do Round 2 with the fpdc to make the honeycomb.
Erangi Udeshika
Hi Sally, If you can tell me what exactly you confused in round 2, I can help you.
“fpdc in same dc” mean fpdc in the same dc that the first dc in the previous round you joined with sl st. “fpdc in next 2 dc” mean, crochet fpdc in each of next 2 dc in the previous round. Anyway, you should make at least 5 rounds to see the honeycomb pattern. 🙂
Sally Gobrecht
I have round 1 done with the nice loops sticking up, and I did a ss to join the piece so I can work in the round, But when I try to do a fpdc following the instructions in the pattern, I can’t figure out how. It says yarn over, insert hook from front to back and to front around the post of the next st, yo, pull up a loop, uo and pull back through 2 loops 2 times, yo and pull through all loops. Do you have a photo showing these stitches you could email to me. I have been crocheting and knitting for more than 50 years and this has me stumped.
Erangi Udeshika
Hi Sally, I think you misunderstand about the instructions. This instruction you mentioned is for how to do fpdc2tog (front post double crochet 2 together) and this special stitch “fpdc2tog” used in the last round 21 on this hat, okay… So you actually need to do normal fpdc (front post double crochet) in round 2 and so on.
I think you probably know how to crochet fpdc because you are crocheting for a long time. 🙂 But if you can’t figure it out you can google search how to crochet “fpdc”.
Sally Gobrecht
Thank you so much! You are right – I was trying to do the other stitch. I knew it had to be something so simple it was stupid of me!
Erangi Udeshika
🙂 You are welcome!
Sally Gobrecht
I’m sorry, but I’m back again. I actually completed 4 rows but it looked nothing like the photo. Each row, since I was doing the fpdc into the next fpdc, seemed to make a new row UNDER the previous one, and I wasn’t connecting anything to make it look like a honeycomb. I am about to give up on this and search for a different hat pattern. I am feeling completely STUPID.
Pingback: