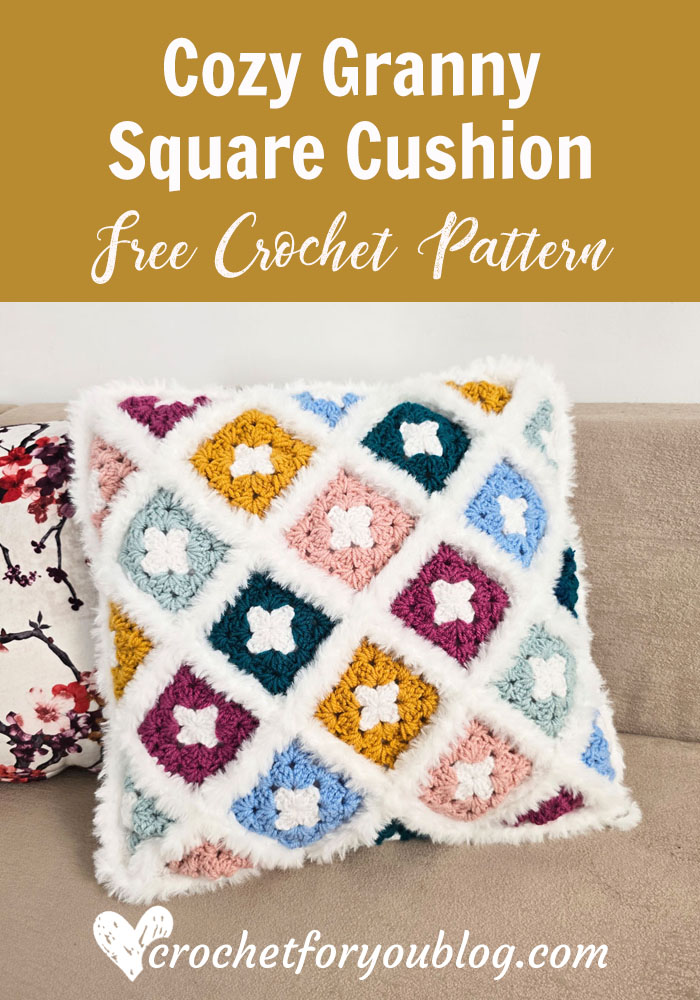
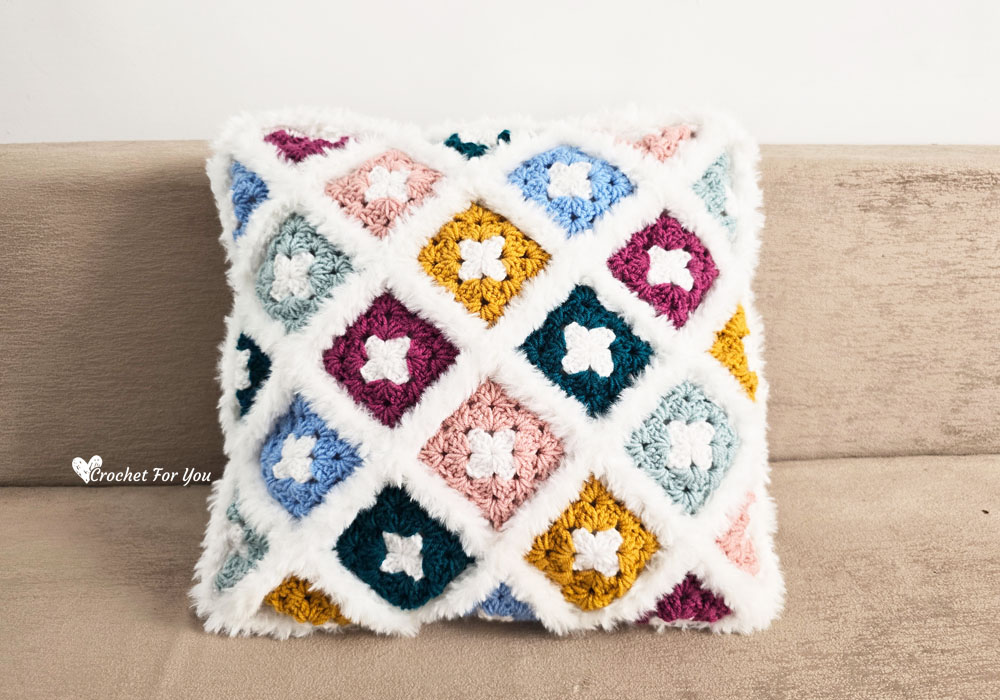
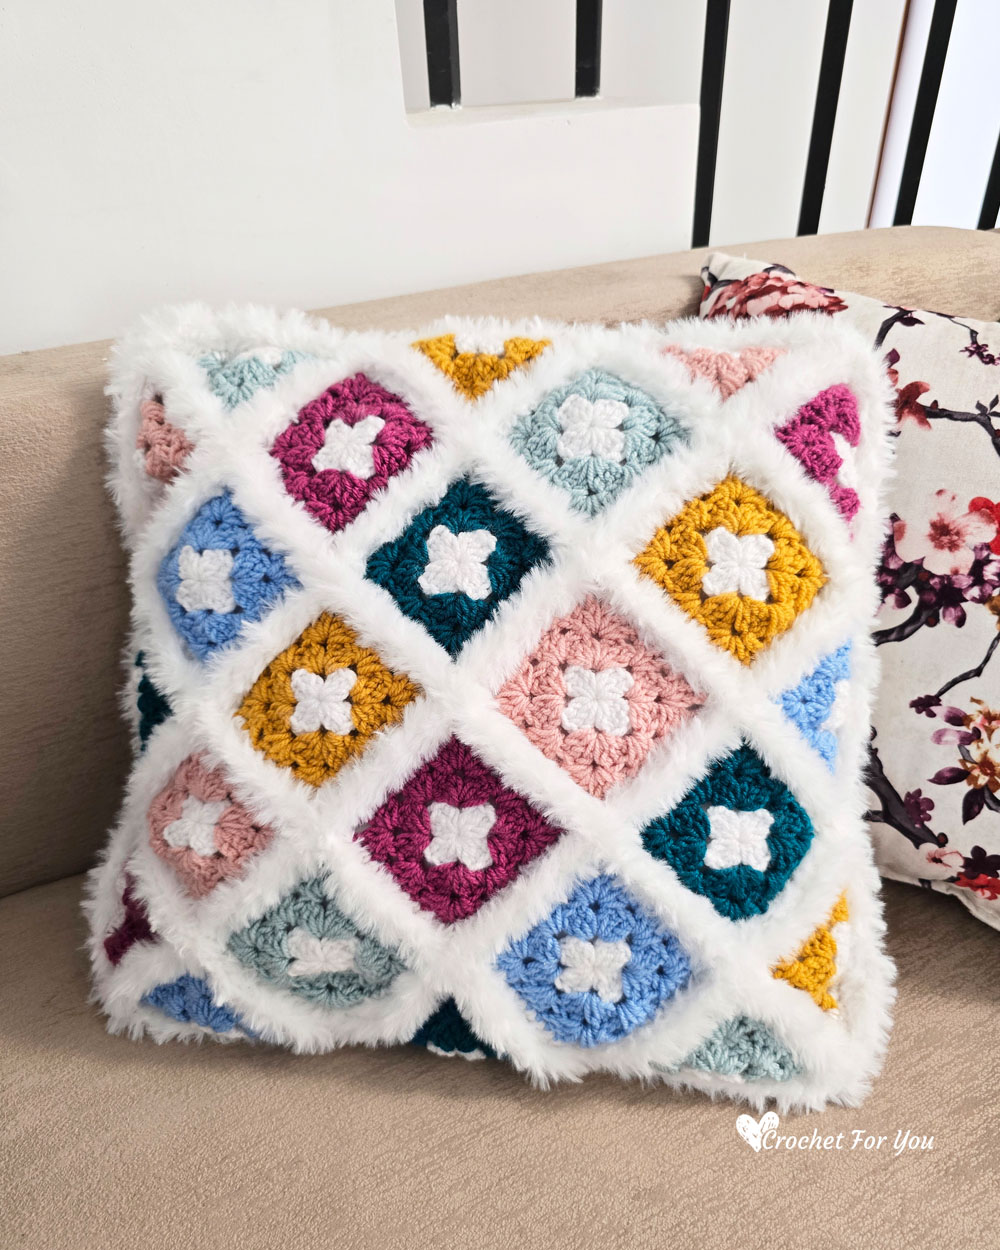
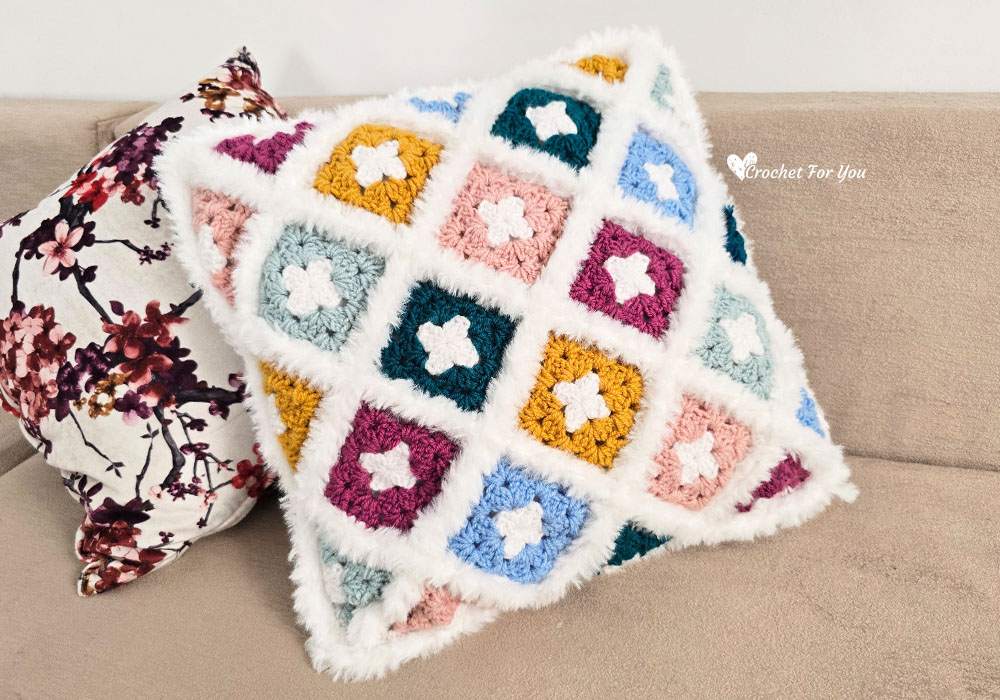
Cozy Crochet Granny Square Cushion Free Pattern
The cozy granny square crochet cushion is made by joining classic granny squares and triangles together, crocheted with scrap yarns. Each square and triangle crocheted individually and joined together to make two large squares first and then joined them together to make a cushion cover.
This Granny Square Crochet Cushion is a perfect blend of vintage charm & modern coziness.
Add this pattern to Ravelry queue
Save on Pinterest
Notes you need to know before start
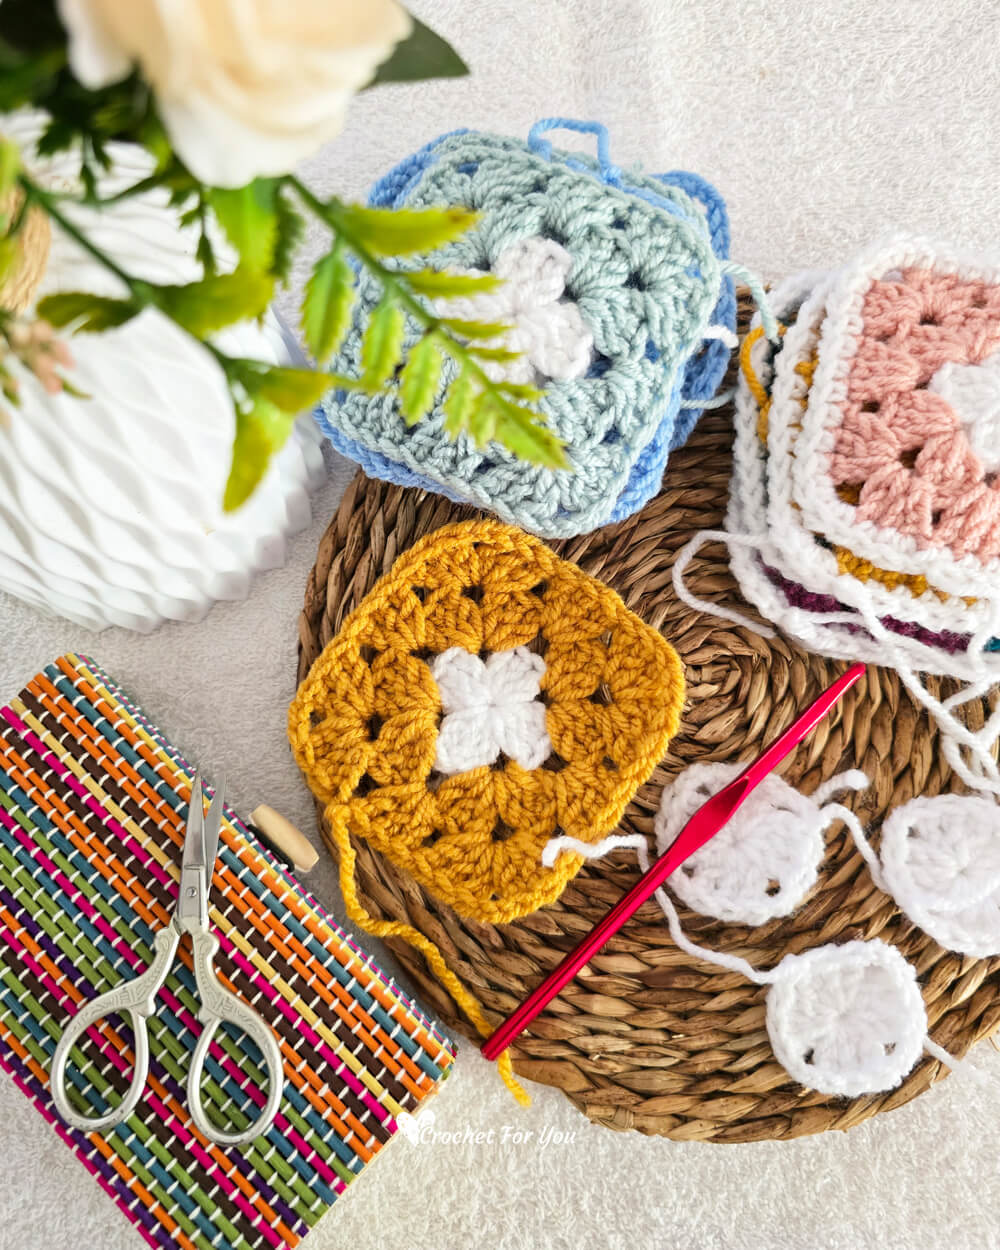
- You will need 24 granny squares and 24 granny triangles to make this cushion.
- 48 total pieces, 24 on each side.
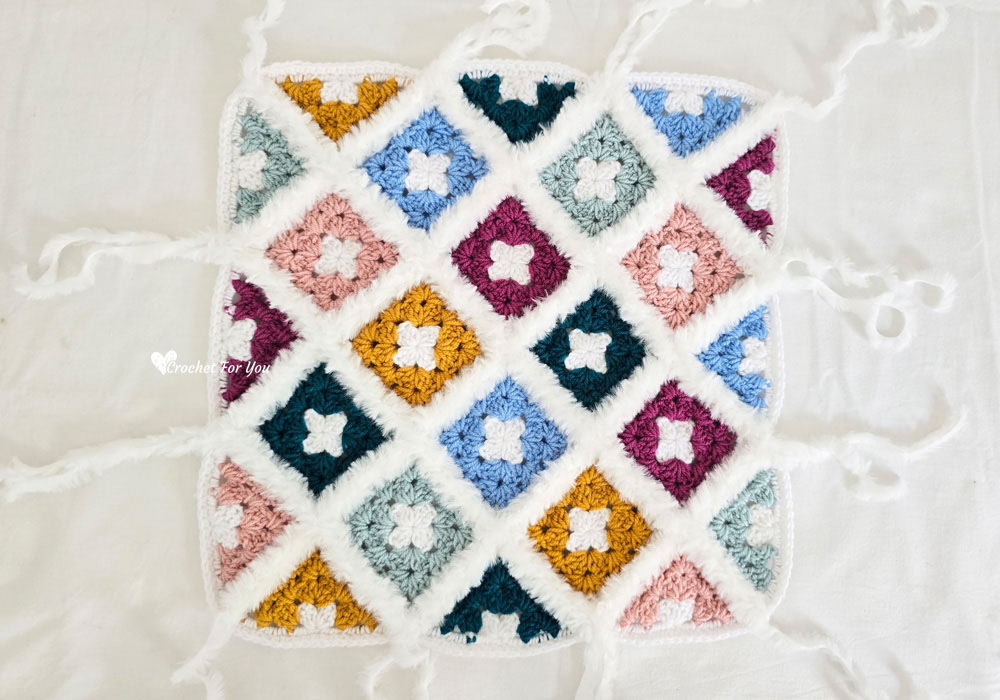
- Once all the squares and triangles are finished, they are joined using a single crochet to make two large square panels first which measure 17”x17”.
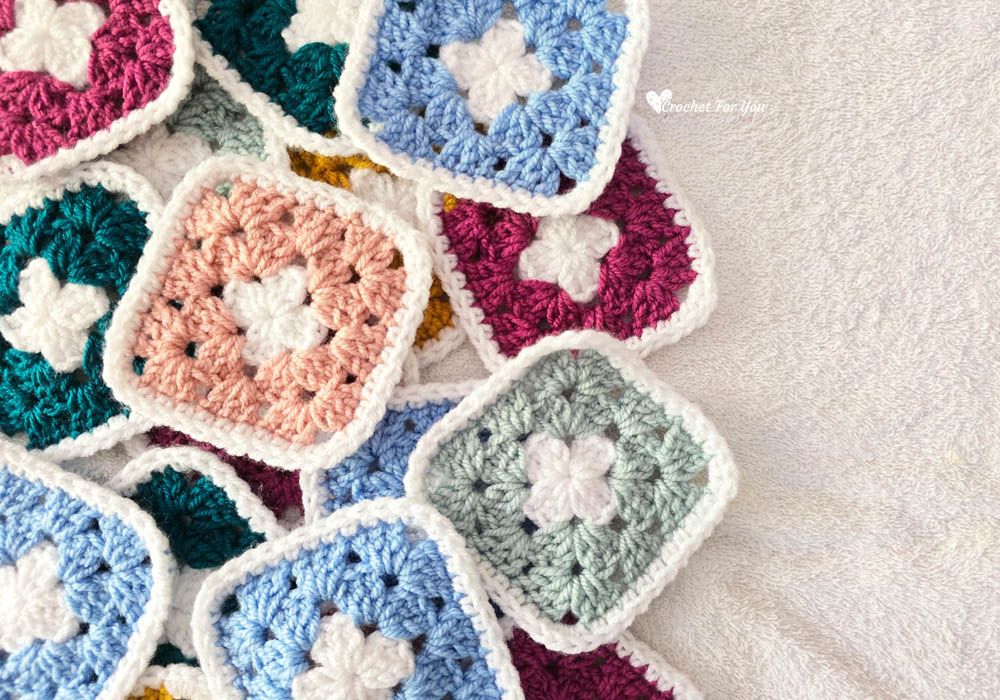
Picking Colors to the project
- I had lots of scrap yarn from other projects. So I chose 6 contrasting colors and white as the main color.
- I made 4 squares and 4 triangles with one contrasting color. So you will have 4 squares and 4 triangles in each 6 of colors.
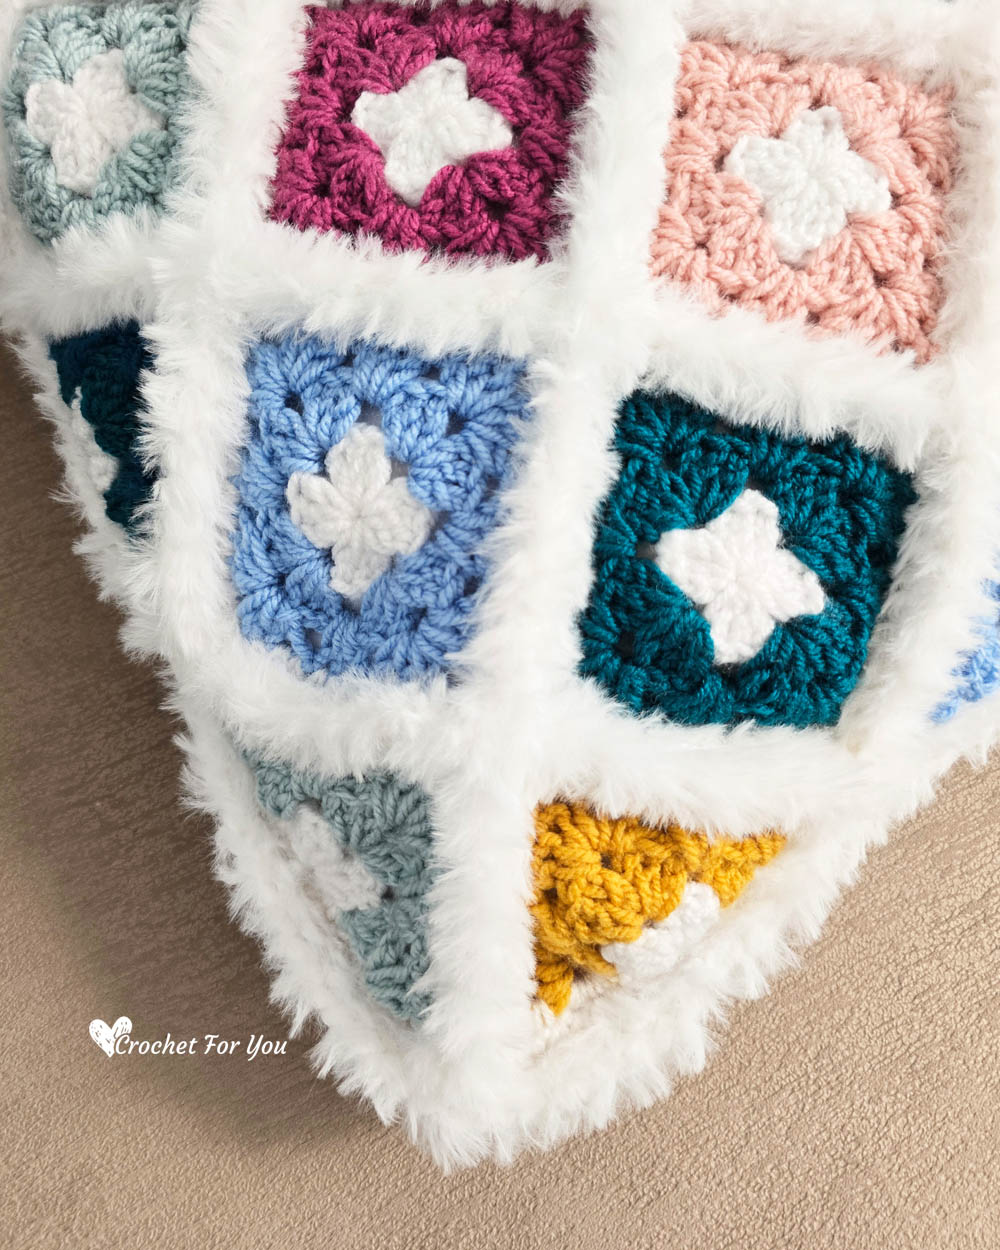
Add more details with fur yarns!
- To feel it more cosy and snuggle, make fur edges to every seaming line using slip stitches.
- And then join large squares together to make a cushion and lastly add fur edge to the cushion to finish.
Skill Level: Intermediate
Finished sizes:
– Granny square: 4.5″ x 4.5″
– Finished size of the cushion cover: 17″ x 17”
Materials:
4-Medium / Worsted weight yarn
- Each granny square requires approx: 10 yards of the contrasting color and approx: 6 yards of main color.
- Each granny triangle requires approx: 6 yards of the contrasting color and approx: 6 yards of main color.
I used
– Ice Yarn Favorite in Gold, Light Blue, Teal, Rose Pink, Water Green, Powder Pink (Approx: 80 yards from each) and 1 and half skein of White
– US I/9, 5.5mm crochet hook
– Tapestry needle for weaving ends.
– Fur yarn approx: 200 yards
– 17” x 17″ pillow form
Gauge: 14 hdc x 10 rows = 4″ with US I-9 (5.5mm) crochet hook
Abbreviations / special stitches (US Term)
- ch – chain
- sl st – slip stitch
- sc – single crochet
- dc – double crochet
- sk – skip
- st(s) – stitch(s)
- *to – repeat * to the instructions.
- beg – beginning
- (RS) – Right Side
- (WS) – Wrong side
- (MC) – Main color
- (CC) – Color color
Granny Square (Make 24 total in 6 contrast colors, 4 from each color)
With MC, make an adjustable ring.
Round 1: ch 3, 2 dc into the ring, [ch 2, 3 dc into the ring] 3 times, ch 2, join with sl st in beg ch 3 top.
Cut the yarn and fasten off. (4 dc clusters)
Round 2: with CC, join the yarn at one of ch-sp, ch 3, 2 dc in ch-2 space (corner space), ch 2, 3 dc in same ch-2 space (corner space), *(3 dc, ch 2, 3 dc) in next corner ch-2 sp; repeat * from around, join with sl st in beg ch 3 top.
Sl st until the next corner ch sp. (8 dc clusters)
Round 3: ch 3, 2 dc in corner ch-2 sp, ch 2, 3 dc in same corner ch-2 sp, * 3 dc in next sp between 3 dc clusters, (3 dc, ch 2, 3 dc) in next corner ch-2 sp; repeat * from around, join with sl st in beg ch 3 top.
Cut the yarn and fasten off. (12 dc clusters)
Round 4: with MC, join the yarn with ch 1, crochet sc around the square, working 3 sc in each corner ch-2 sp, sl st to the first st. Fasten off, weave the ends. (48 sts)
Granny Squares Triangle (Make 24 total in 6 contrast colors, 4 from each color)
With MC, make an adjustable ring.
Round 1: ch 4 (count as dc and ch 1), 3 dc, ch 2, 3 dc into the ring, ch 1, dc into the ring, (image 1 below) turn. (2 dc clusters)
Cut the yarn and fasten off.
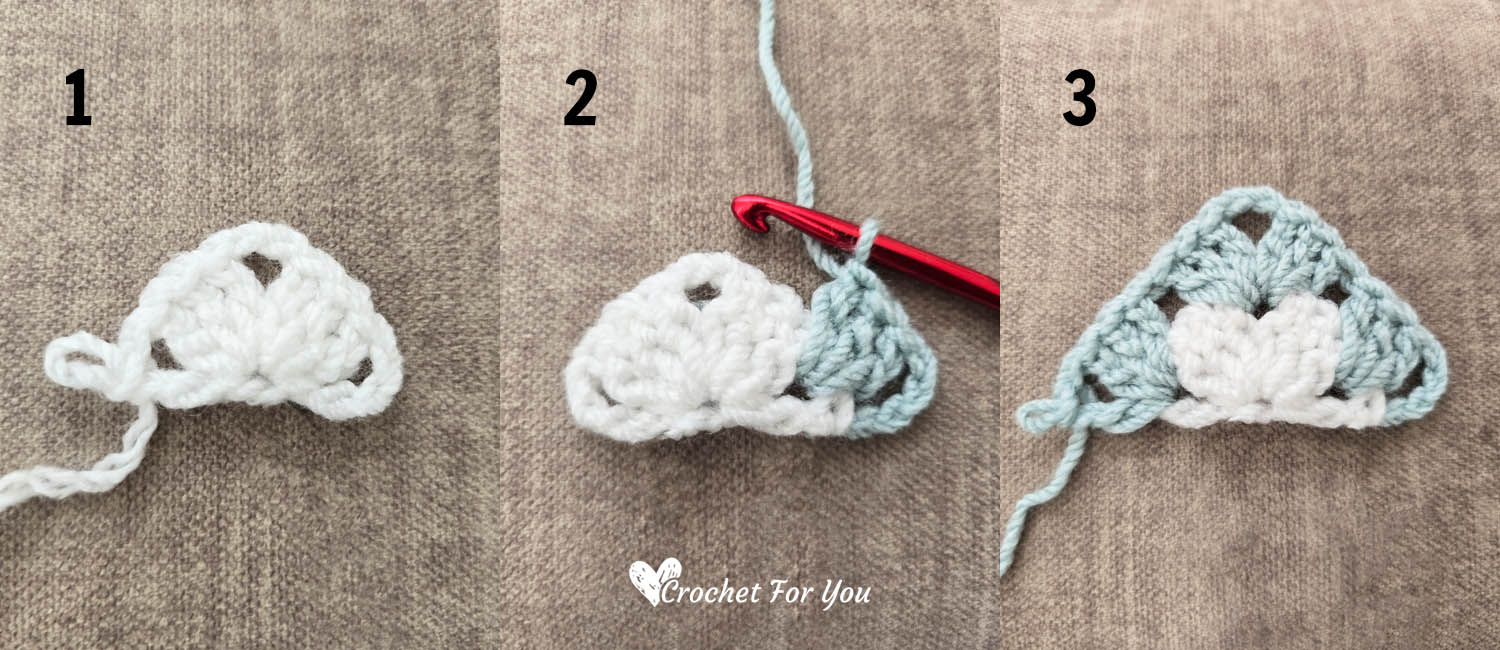
Round 2: with CC, join the yarn at last dc in previous row,
ch 4 (count as dc and ch 1), 3 dc in ch-1 sp (image 2), (3 dc, ch 2, 3 dc) in next ch-2 sp, 3 dc in last ch-1 sp, ch 1, dc in beg ch 3 top (image 3), turn. (4 dc clusters)
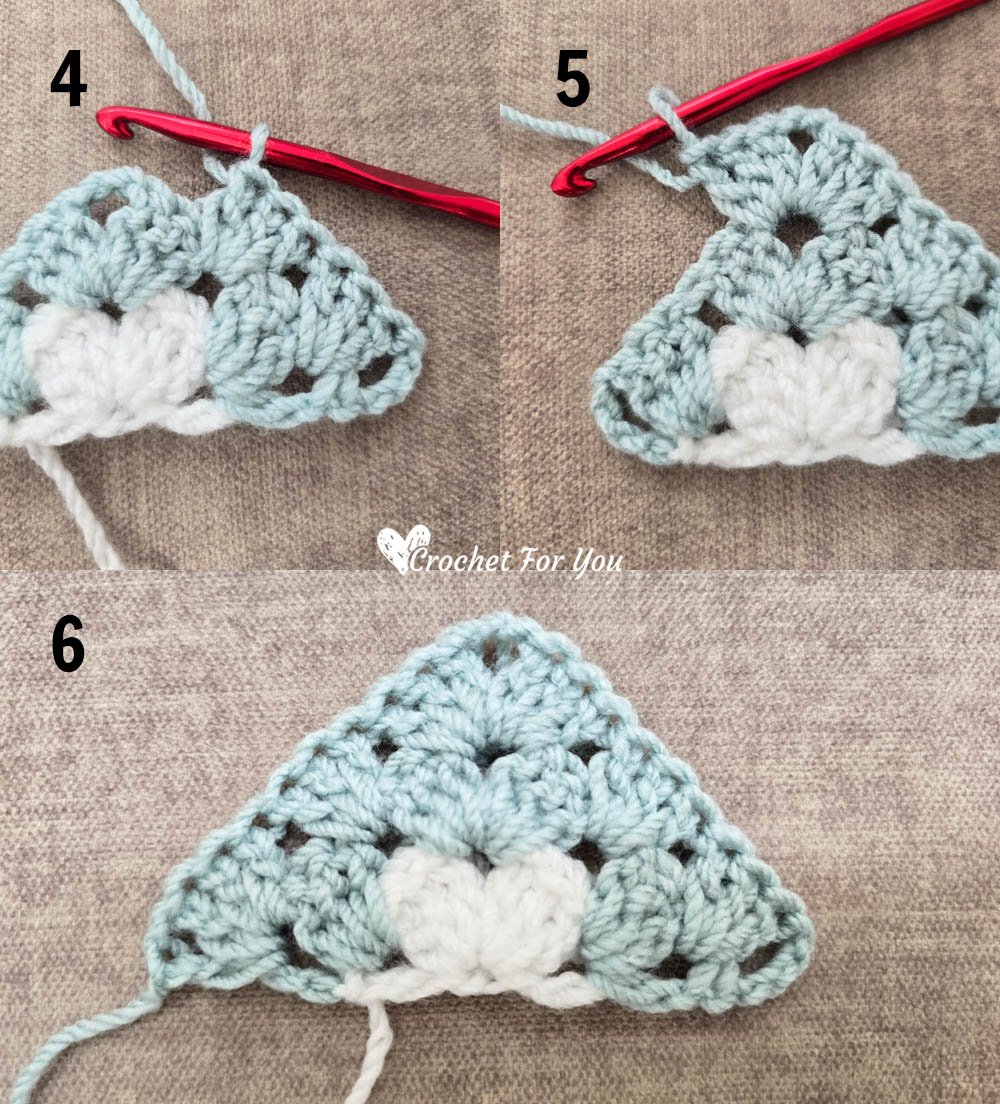
Round 3: ch 4 (count as dc and ch 1), 3 dc in ch-1 sp, 3 dc in next space between 3 dc cluster (image 4 above), (3 dc, ch 2, 3 dc) in next ch-2 sp (image 5), 3 dc in next space between 3 dc cluster, 3 dc in last ch-1 sp, ch 1, dc in beg ch 3 top (image 6), turn. (6 dc cluster)
Round 4: crochet sc around the triangle.
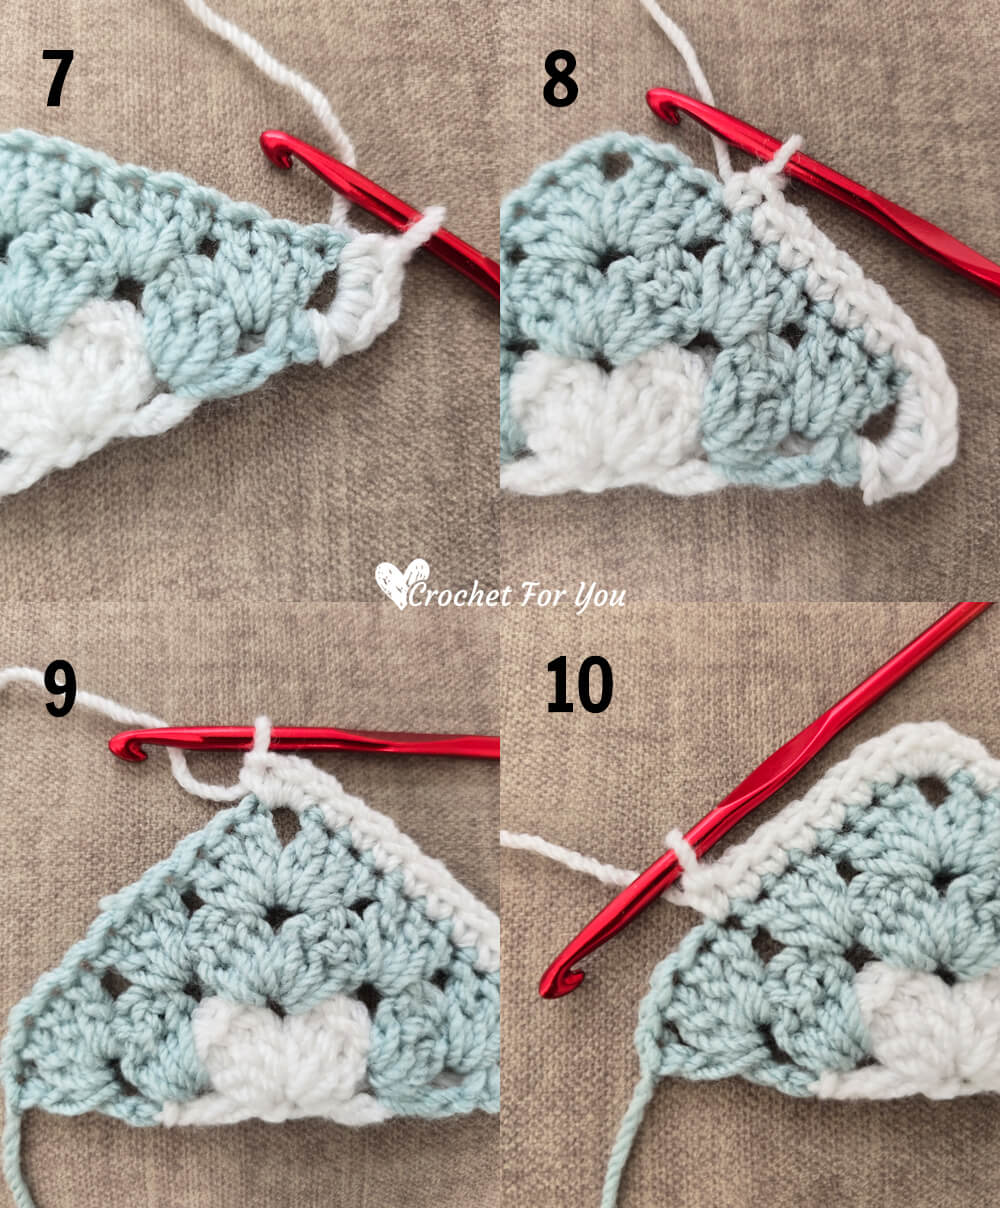
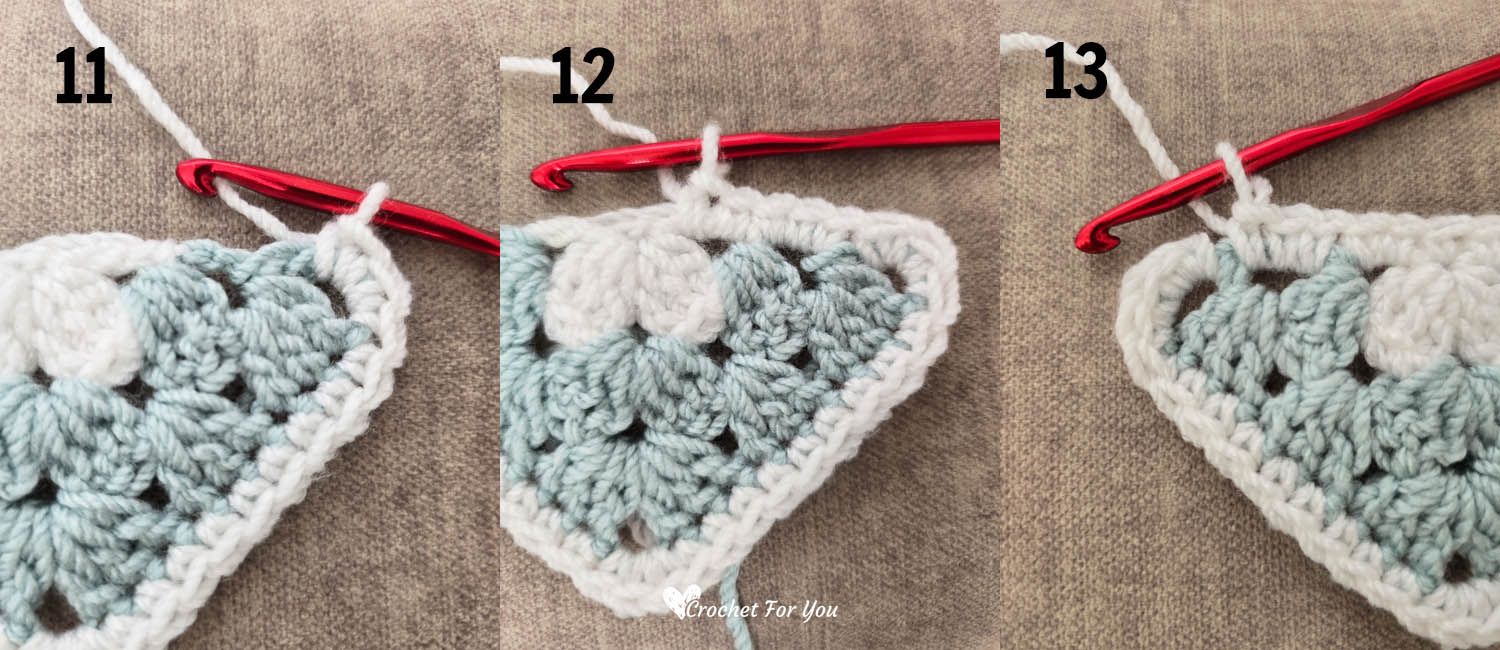
with MC, join the yarn at ch-4 sp below the triangle, 3 sc in ch-4 sp (image 7 above), start working up on the triangle, sc in each st until ch-2 sp remain (image 8), 3 sc in ch-2 sp (image 9), start working down on the triangle (image 10), sc in each st until next ch-sp remain, start working bottom of the triangle, 3 sc in ch-sp (image 11 below), 3 sc in next sp, 2 sc in next sp (image 12), 1 sc into the adjustable ring, 2 sc in next sp, 3 sc in next sp (image 13), join with sl st in first st.
Cut the yarn & fasten off. Weave all the ends. (38 sts)
Joining granny squares and triangles

Arrange the 12 squares and 12 triangles as shown in the image above. I selected 2 squares and triangles in same color from each contrasting color. Don’t forget to arrange the pieces by color evenly all over. Start joining pieces together using single crochet.
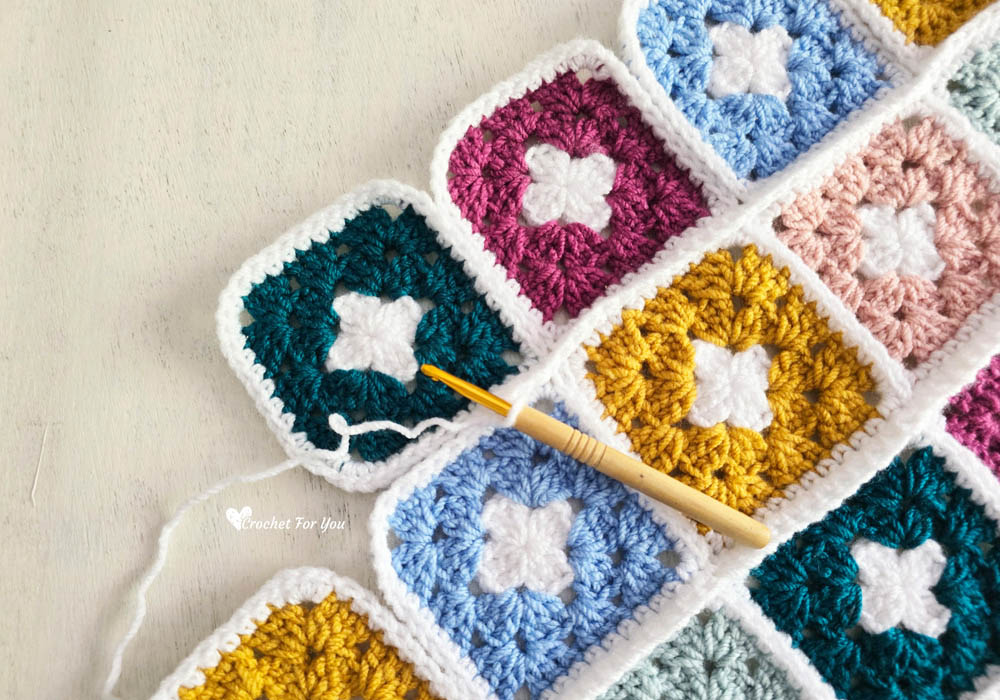
Hold 2 pieces together facing the wrong side (WS) each other. Start from the middle st of the 3 st at the corner of both pieces. Insert the hook into the both loop of each piece and start to crochet with single crochet until the middle stitch of the next corner. Pick another two and repeat this method to join all the squares and triangles to make a large square. Make 2 large square panels.
Edging: (make edging to the each panel)
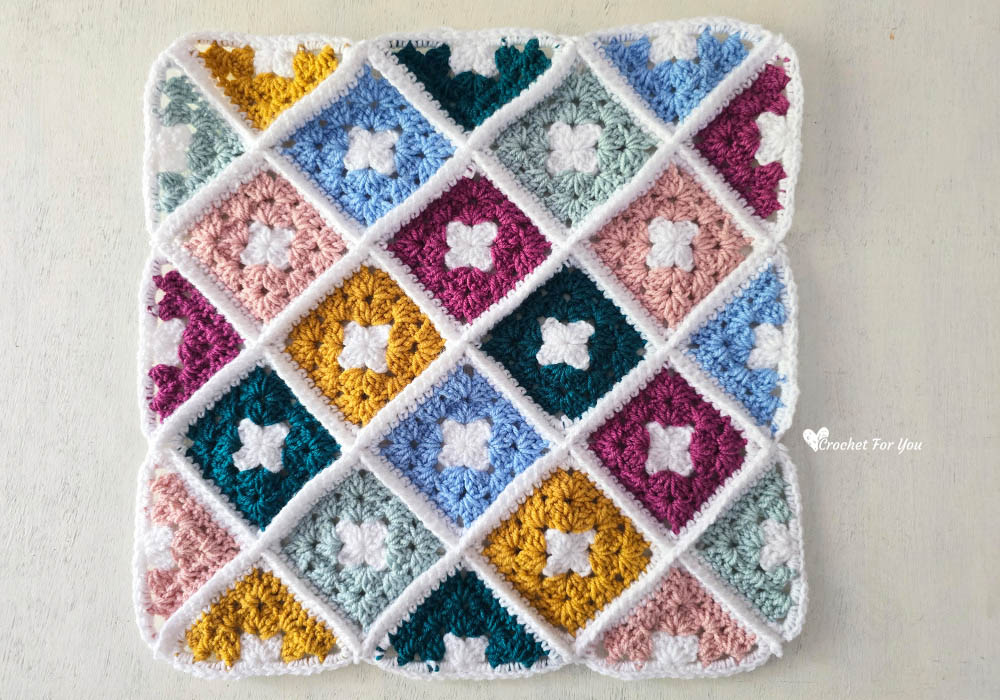
(RS), join white color yarn and crochet sc in around the penal, when reach to the corner (the last st of the side you are working), crochet 2 sc in corner st of one side, ch 1, 2 sc in other side corner st (the first st of the next side), shown as image below, I crocheted 188 sc sts around. Fasten off and weave the ends.

Adding fur lines
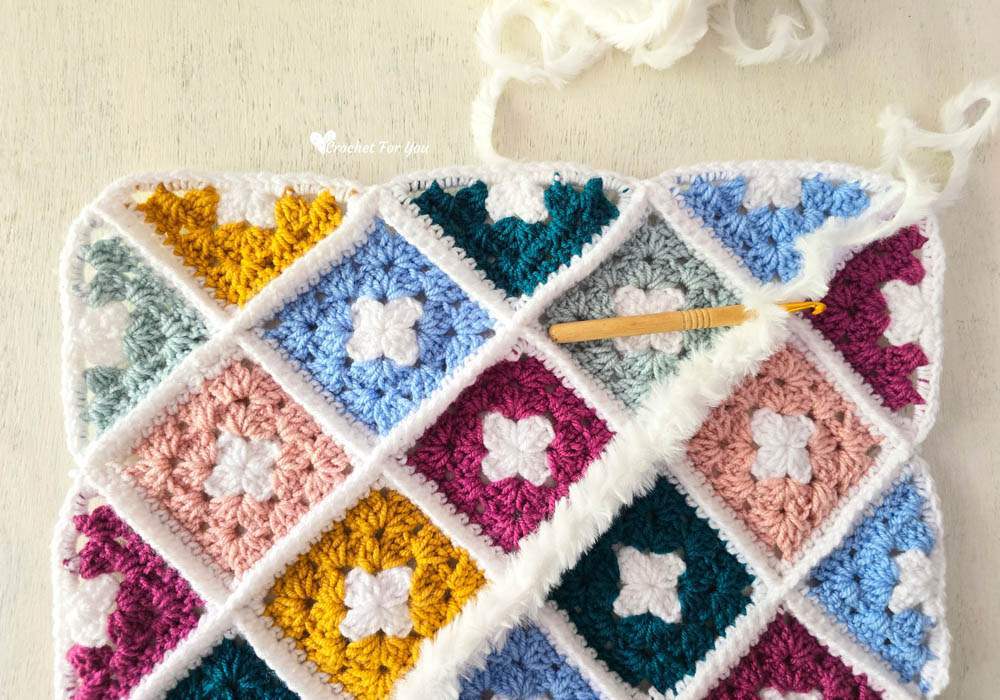
Start making fur edges on every single crochet joining. Make slip stitches with fur yarns on every single crochet joining lines. Weave ends before starting joining panels.
Joining 2 squares together with single crochet

Get the two panels facing the wrong side (WS) each other, insert the hook in both pieces, ch 1, sc in same st, sc in each st around. When one side opening, insert the pillow inside and continue joining the pillow until last st. join with sl st to the first st. (188 sts total around the edge.)
Cut the yarn & fasten off.
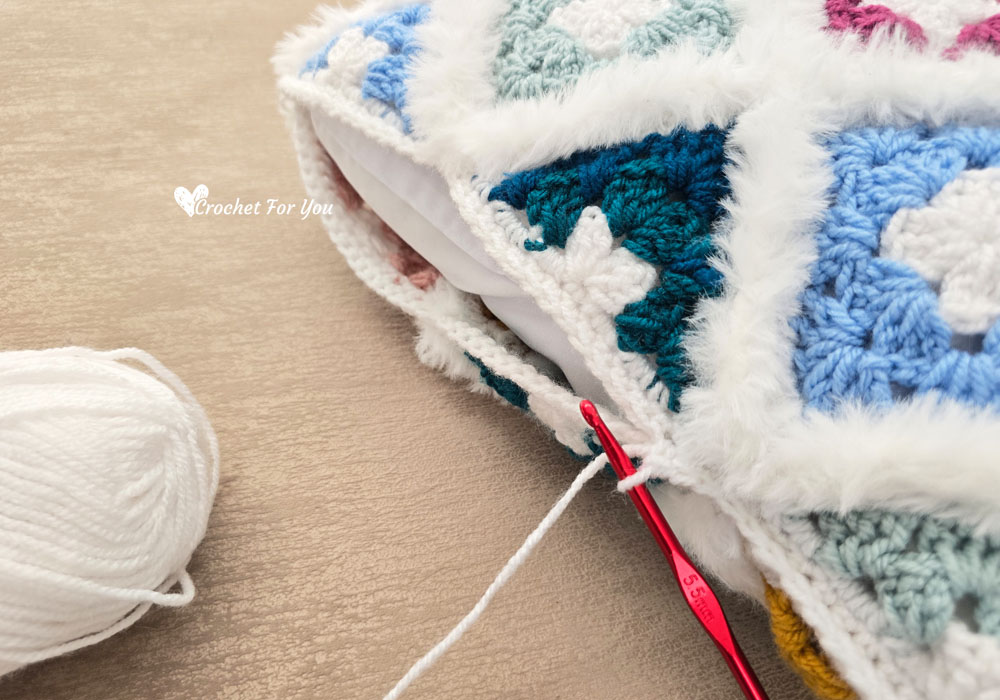
Start making fur edges around the cushion too. Make slip stitches with fur yarns in every sts around. Fasten off and weave the ends.

Hope to see you soon with a new FREE pattern
Until then, Happy Crocheting!!
Share your finished projects of this pattern on Crochet For You FB page.
Happy hooking with Crochet For You!!
Let’s connect and share
Facebook | Pinterest | Twitter | Instagram
All contents include photography and patterns are copyrighted Crochet For You by Erangi Udeshika.
Do not copy, edit, distribute or republish patterns and images in this blog in part or whole as your own. Please, share a direct link to the pattern with others and anywhere else. You are welcome to make and sell finished items using my patterns.
Visit Copyright / Terms of use for more info.
Thank you.